How do you install thermal insulation on a flat roof?
Instructions for the installation of Thermano thermal insulation on a flat roof.
Instructions for the installation of Thermano on a flat roof.
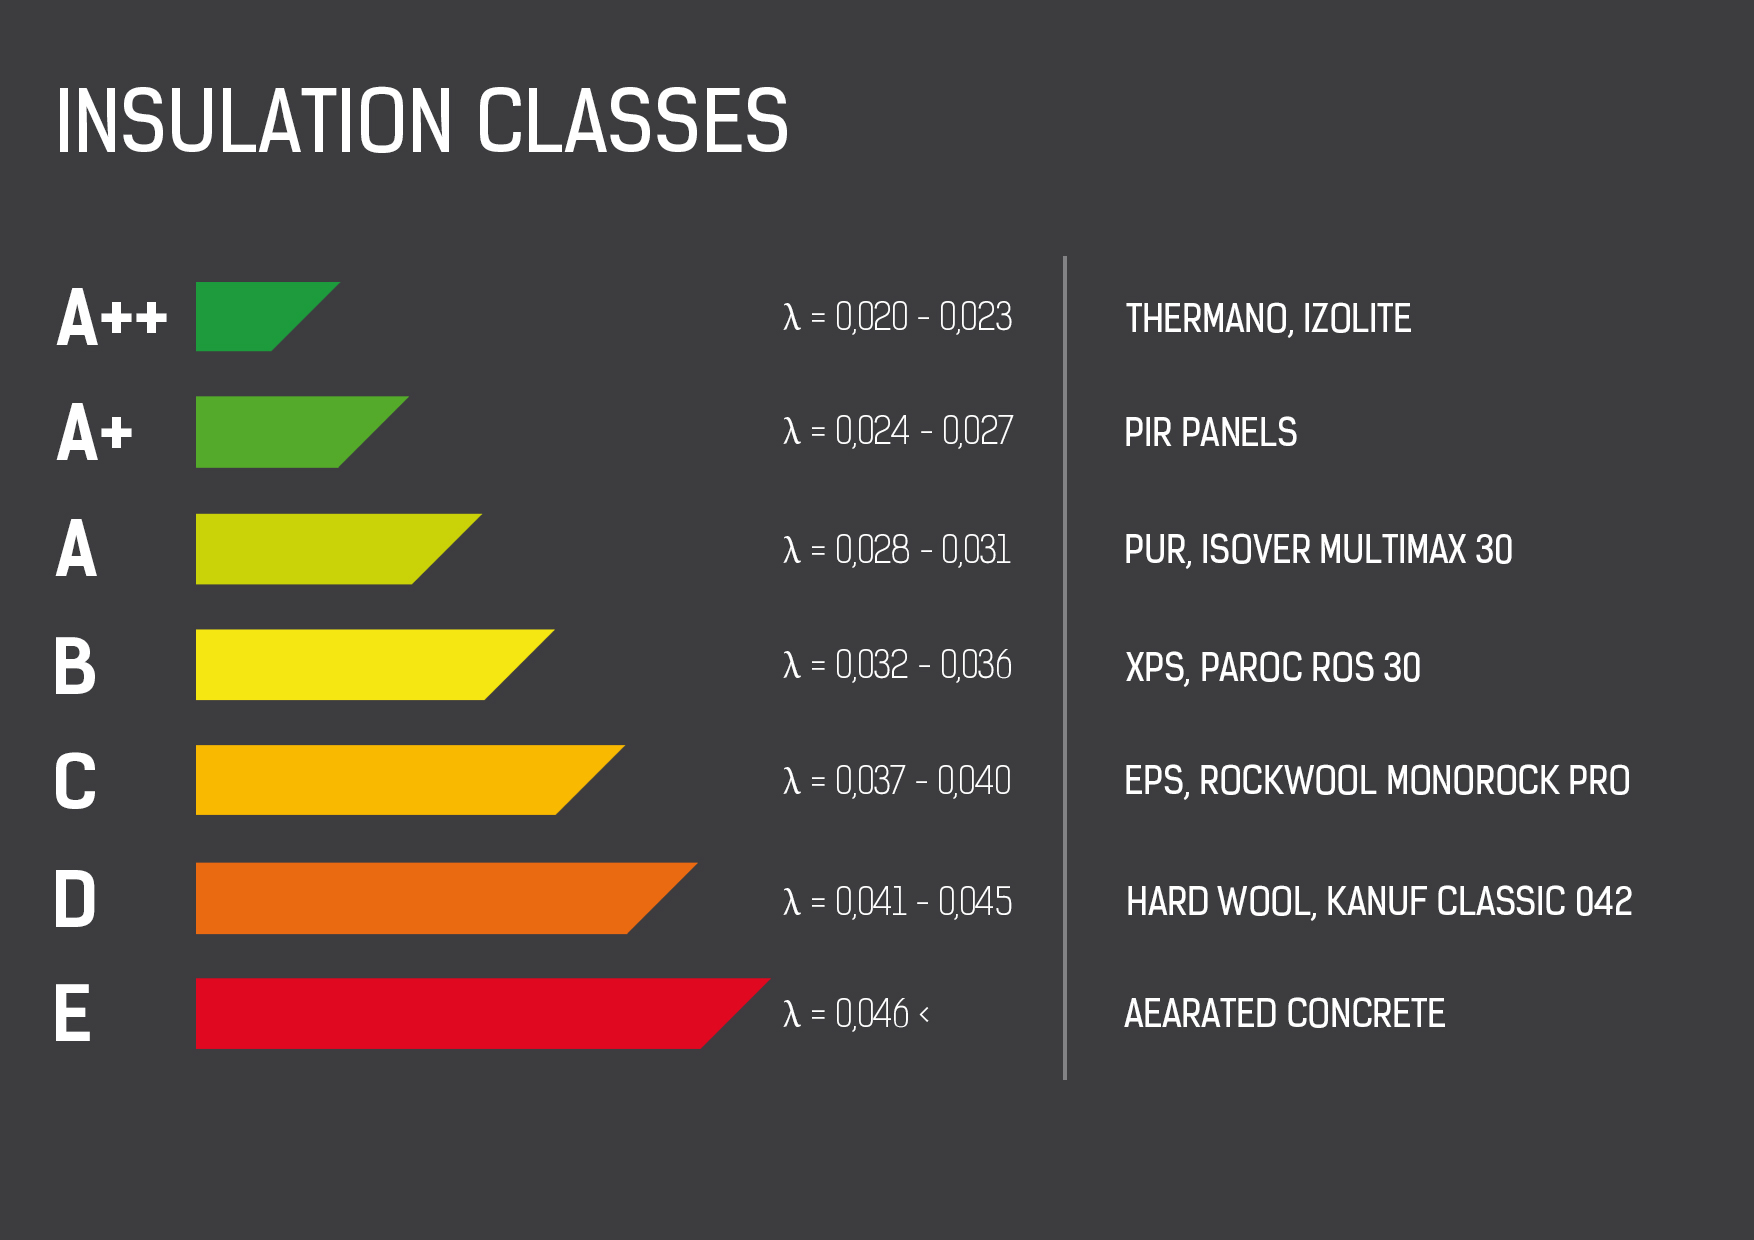
Most heat escapes from buildings through a poorly insulated roof. The proper insulation of the roof helps to maintain the appropriate thermal comfort in the house, and to significantly save on heating. The PIR boards are used wherever materials with the highest thermal insulation class (A+++) are required.
How much does it cost to insulate a flat roof?
The thermo-modernisation or installation of thermal insulation in a new building should be regarded as an investment. In the case of Thermano, the reduction of costs associated with heating the house is so significant that it can be assumed that after about 3-4 heating seasons the investment will pay off 100%.
Insulating a flat roof with Thermano PIR boards is extremely fast and simple. Installation is so simple that it can even be done by an amateur, if the structural layer on which the insulation is to be installed is ready. In the case of insulating residential houses, the fitting of insulation can take several hours. It is also important to ensure that safety precautions are taken when working at height.
Insulating a flat roof step by step.
1. The installation of Thermano boards on a flat roof begins with the installation of structural trapezoidal metal sheets that form the bearing substrate. Sheets should be laid loosely, without unnecessary pressure or elongation. To attach trapezoidal metal sheets to the structure, use the solutions recommended by the designer based on static calculations. The selection of fittings, their length, diameter and thread rolling pitch or the type and number of studs should meet the design requirements.
2. All process openings meant as entire roof section penetrations, such as exhaust chimneys or drain risers should be made with trapezoidal metal sheets before the subsequent layers are laid. Thermano boards have the volume weight of as little as 30 kilogrammes per cubic metre, so no heavy equipment is required to deliver the packages to the roof or for horizontal transport.
3. The next stage is the application of vapour barrier film. Note the direction of application of the subsequent film stripes so that the overlaps follow the direction of the roof pitch. Ask the supplier about the proper size of film overlaps.
Having applied the film, you can begin to lay the Thermano boards, taking care to place them tightly with the long side perpendicular to the folds of the trapezoidal metal sheet so as to minimise the number and length of unsupported joints.
4. The subsequent stripes of boards should be staggered so as to maximise the tightness of the connections between the adjacent elements. On a conventional flat roof, covered with hydro-insulation membrane, Thermano boards are installed with mechanical attachment using telescope fittings that essentially protect the screws from thermal bridging and condensation on the internal side of the roof. The correct number is 2 telescope screws per square metre of Thermano or 6 screws per board of the standard size, namely 1200 x 2400 millimetres.
The fittings should be attached only on the internal side of Thermano boards, at a distance of about 5 centimetres from the edge of the board. It is absolutely unacceptable to use the same fittings to connect two or three adjacent boards.
Thermano boards can be laid in one layer, however it is safer to lay them in two staggered layers so that the fixtures of the adjacent rows and layers do not overlap.
The first layer should also be attached with telescope fittings, one or two fittings per board. The second layer should be attached in the same manner as single layer thermal insulation, namely two pieces per square metre.
5. Cutting Thermano boards requires no special tools. All joints should be filled with low pressure polyurethane foam.
6. Thermano boards can be covered with all types of hydro-insulation. Hydro-insulation membranes are most often attached using the same telescope fittings as those used for Thermano boards. The number of fittings per linear metre depends on whether it is the roof slope or the edge zone. Generally, the first edge is attached mechanically and the subsequent are welded to the following hydro-insulation strip, while maintaining an appropriate overlap.
Generally, the first edge is attached mechanically and the subsequent are welded to the following hydro-insulation strip, while maintaining an appropriate overlap.
7. The attachment of Thermano boards to the edge roof work requires undercutting the boards to form a rainwater slope so as to avoid puddling on the roof surface.
Note that eave work must be made of sheet metal coated with a material that can be welded to the roof membrane so as to protect the tight and effective connection against the wind.
With the Thermano thermal insulation installed...
-
You will have a roof with excellent thermal protection, and one of the best materials available on the market; to compare performance, Thermano’s lambda parameter λ (the heat-conductivity coefficient - the lower the value the better it insulates) reaches the level of 0.023 (W/mK, whereas even high-quality mineral wool performs at the level of 0.040 (W/mK). This means Thermano has almost-twofold better insulation.
-
You will secure your roof for many years. Thermano is extremely durable, resistant to pressure and moisture, and does not lose its thermal insulation properties over the years.
-
You will immediately notice that less energy consumption is needed to heat your home, which will translate into significant savings.
See more
- Instructions for installing Thermano in flooring
-
Instructions for installing Thermano thermal insulation over the rafters of a sloping roof
-
Instructions for installing Thermano thermal insulation under the rafters of a sloping roof
- Instructions for installing Thermano on a green roof
-
Instructions for installing the Thermano thermal insulation system on a cavity wall
If you have any questions, please contact Thermano technical consultants:
+48 801 000 807